
When XTRAC finds work items meeting your criteria, it displays them in a list. If the results span multiple pages, page navigation buttons are displayed below the list as shown below:

By default, XTRAC sorts the resulting list based on the Work Item Number column. You can accept the default display of the work item data that appears in the list or you can specify the data you want to display.
From this list, you can open work items, print the list, or transfer work items.
XTRAC uses standard alphanumeric sorting when it displays the results; that is, numbers come before letters, and uppercase letters come before lowercase letters. For example, 1222 comes before 12a.
XTRAC displays results in the following ways:
Note: If you perform a search with Search All Parties selected, XTRAC displays the applicable work item once for each set of matching criteria. For example, work item W017039-06DEC09 has a customer name of Amanda Rose in the ORIG party. Another party contains a customer name of Lauren Rose. If you search by the last name of Rose, the W017039-06DEC09 work item appears twice in Search Results.
The following is an example of the results of a search. XTRAC displays the total number of work items found by the search at the top of the Search Results pane.
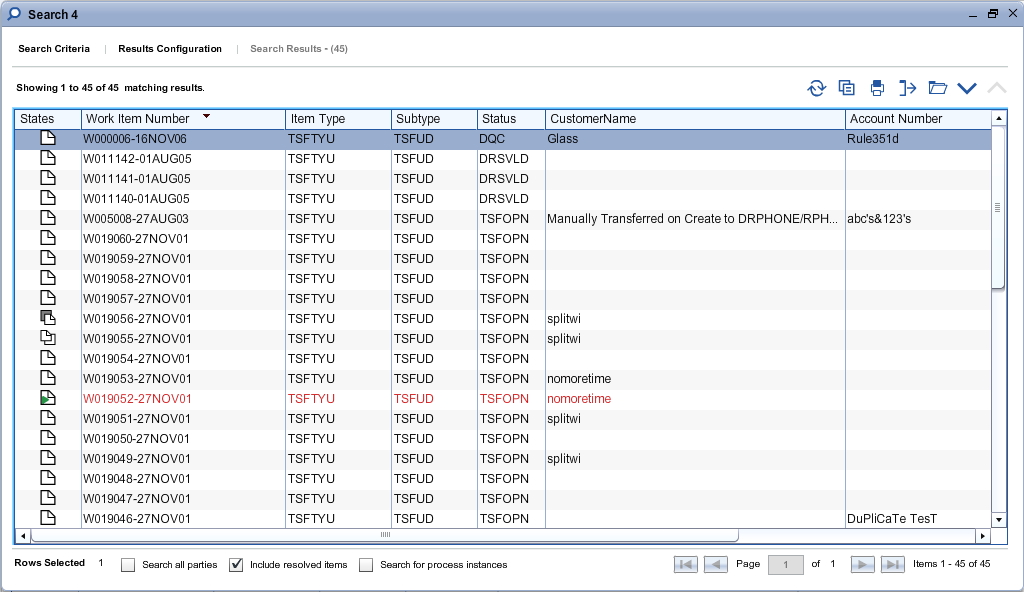
The following rules apply for search results:
When XTRAC displays the search results list, it displays 500 items at a time.
XTRAC Workbench moves through the first 500 items in the search results list. When you reach item 500 in the results, XTRAC Workbench adds the next 500 items to the display.
After XTRAC displays your list, you can choose to sort the currently displayed search results by almost any of the column headings.
Note: You cannot sort the search results list by Customer Name.
You may want to resize columns in your search results list to be able to view more information about the items in the list.
You can select and open one or up to ten work items from this list at the same time.
On the Search Results page, open the work items by doing one of the following:
Note: If you notice a decrease in performance, you may have too many work item windows open at the same time. Close the unused work items to increase performance.
Each selected work item opens in its own window.
You can print the list of work items that appear in your search results, up to a maximum of the 500 items that XTRAC retrieves at any one time. Optionally, you can select the items to print from the 500 work items being displayed.
XTRAC prints the first 175 characters in landscape orientation in one row. XTRAC also prints the column headings and the total count of how many items are in the list.
| 1. | (Optional) On the Search Results page, select the items you want to print. |
To select multiple items, hold down CTRL and click the wanted items.
| 2. | Open the Print Search Results dialog. On the Search Results page, do one of the following: |
| 3. | On the Printer drop-down list, select a printer. |
XTRAC retains the selected printer name and displays it by default the next time you print.
| 4. | (Optional) Select applicable items from the list. |
| 5. | Choose a Print Range option (All or Selection). |
| 6. | Click OK. |
If you have appropriate privileges and the node allows manual transfers of work items, you can transfer a work item to another work or personal queue.
| 1. | On the Search Results page, select the work items to transfer. |
To select multiple items, hold down CTRL and click the wanted items.
You cannot transfer work items to which you don’t have work access, parent work items awaiting rendezvous with their children, or suspended work items.
| 2. | Open the Transfer Work Items dialog. On the Search Results page, do one of the following. |
XTRAC lists the work items selected for transfer.
Note: If you selected a frozen parent or suspended work item, XTRAC filters them from the list and does not display them in the Transfer window.
| 3. | On the Transfer To field, enter a queue name or select a queue from the drop-down list. |
By default, XTRAC displays your personal queue.
Note: If you leave your personal queue in the Transfer To field and the Allow items to be manually transferred into this operator’s personal queue option is not selected in your entitlement set, XTRAC displays an error message and the transfer does not occur.
| 4. | On the Memo field, enter an explanation (up to 60 characters) for the transfer. |
| 5. | Click Transfer. |
XTRAC transfers the work items and closes the Transfer Work Items dialog.
If one or more work items do not successfully transfer, the Transfer Work Items dialog remains open and XTRAC displays an error message in the notification bar on the dialog. The Transfer Status column provides additional information about why the transfer could not be completed for those items that were not transferred and includes the name of the queue to which work items were successfully transferred. In addition, the left-most column includes an indicator as to the success or failure of the transfer. Determine why the work items did not transfer and try again.
Note: If XTRAC transferred the work item from the queue you selected to another queue based on rules at the selected queue, XTRAC provides the name of the final destination queue.
By default, the Search Results list displays the following columns:
You can specify the columns you want to display in the Search Results list. The Work Item Number field must always be displayed, but you can specify up to nineteen additional columns. You also can place the columns in any wanted order.
Note: If you choose to include the Customer Name field, XTRAC populates it with either the value from the Last Name field or the Organization Name field, whichever appears in the work item.
You can configure your own search results in the following ways:
You also can restore the default set of search fields provided by XTRAC or your own default search.
| 1. | Open a Search window. |
| 2. | Click the Results Configuration tab. |
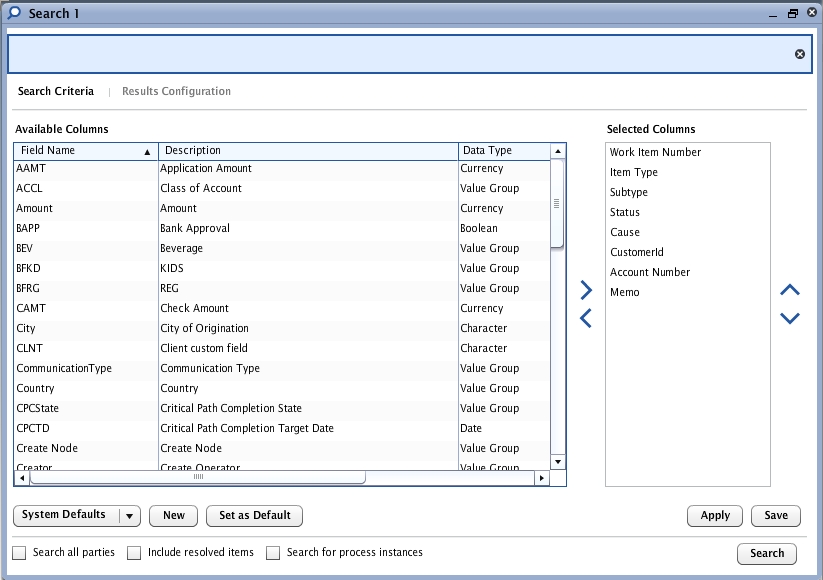
The Results Configuration page contains a list of all available columns (predefined and custom) from which you can select and the columns currently selected to be displayed in the Search Results list.
| 3. | To add a column to the Selected Columns list, select one or more columns from the Available Columns list. |
XTRAC Workbench moves the field from the Available Columns list to the Selected Columns list and appends the fields to the bottom of the list as the last column. If you select multiple fields that will bring your total of selected columns to more than the maximum of 20, XTRAC does not add any of the fields and XTRAC displays an error message.
Note: To find a field, select any field in the list and then type in the first letter of the field for which you are searching. XTRAC Workbench displays the first field in the list beginning with the letter you entered.
Note: If you have reached the maximum number of columns in the list (20), XTRAC disables the Add button.
| 4. | To remove a column you do not want to view in the Search Results list, click the applicable column heading in the Selected Columns list and then click the Remove button or drag the field back to the Available Columns list. |
XTRAC Workbench removes the selected column.
Note: You cannot remove the Work Item Number column.
| 5. | To move a column up or down in the Selected Columns list to reorder the way the columns appear in the Search Results list, select a column in the Selected Columns list and click Up or Down. |
XTRAC Workbench reorders the columns.
The following figure is an example of a configuration where the Cause column has been added and the existing columns reordered.
| 6. | Click Apply. |
XTRAC Workbench saves the columns and their order for this XTRAC Workbench session. Until you log out of XTRAC Workbench, every search you perform will now use this search results configuration.
In addition to specifying a search configuration to use during an XTRAC Workbench session, you can define one or more search result configurations and save these configurations to use over and over again when you search for specific types of work items. There is no limit to the number of configurations you can define.
| 1. | Open a Search window. |
| 2. | Click the Results Configuration tab. |
The Results Configuration page contains a list of all available columns (predefined and custom) that you can use to select which columns display in the Search Results list.
| 3. | Below the Available Columns list, click the New button. |
XTRAC clears all column names from the Selected Columns list except for the Work Item Number.
The New button changes to the Cancel button. Clicking the Cancel button returns you to the default configuration.
| 4. | On the Available Columns list, select a column name and click the Add ( |
| 5. | (Optional) Using the Up Arrow button ( |
| 6. | On the text box in the lower left-hand corner, enter a name for the configuration. |
| 7. | Click Save. |
XTRAC Workbench saves the configuration and adds it to the drop-down list below the Available Columns list. This new configuration is now available to use any time by selecting it from the drop-down list and clicking Apply. The drop-down list changes to a text box when you click the New button.
You can specify that one of your own search results configurations be used as your default search for all the searches you perform.
| 1. | On the applicable Search window, click Results Configuration. |
| 2. | On the drop-down list at the bottom left of the Results Configuration page, select the search results configuration you want to use as your default. |
| 3. | Click Set as Default. |
XTRAC Workbench saves the columns and their order. These settings apply to all subsequent basic or advanced searches.
Note: To return to using System Defaults as your default configuration file, follow these steps and choose System Defaults from the drop-down list before clicking Set as Default.
