Managing Roles
Administrators with the applicable roles associated to their user IDs may manage roles for their organizations using the Roles page. Only the administrators of organizations can assign roles to their organizations' users, giving them permissions to use XRA at different levels of access.
IMPORTANT: To avoid organization ID conflicts, administrators must not create suborganizations below the parent organization. Equally, they must not delete existing organizations.
When you log on as an administrator, the Manage item displays on the XRA menu bar. Its menu list contains options to manage users and user roles. To learn more about managing users, see Managing Users.
NOTE: The "XRA menu bar" is the green banner near the of the page.

You can do the following on the Manage Roles page:
- View roles
- Select organizations
- Search roles
- Manage role properties
- Create a role
- Assign users to a role
- Delete roles
By default, XRA includes the following default roles.
| Role | Description |
|---|---|
| ROLE_ADMINISTRATOR |
Determines organization admin privileges. This is a special system-level role. Organization administrators may assign this role to other users as well. Note: Do not delete this role. It is required for server administration. |
| ROLE_USER | XRA automatically assigns this role to every new user. To log on to XRA, you must have this role. |
Because the same role ID can be defined in separate organizations, the same roles can be assigned to users in different organizations. Administrators manage all the roles in their organizations and sub organizations. For security reasons, they cannot view roles in other administrators' organizations.
Viewing Roles
| 1. | Log in as an administrator for the user’s organization. |
| 2. | On the XRA menu bar, select Manage > Roles. |
The page displays three panes, Organizations, Roles, and Properties, in which the administrator can select the relevant organization, manage roles, and edit their properties, respectively.
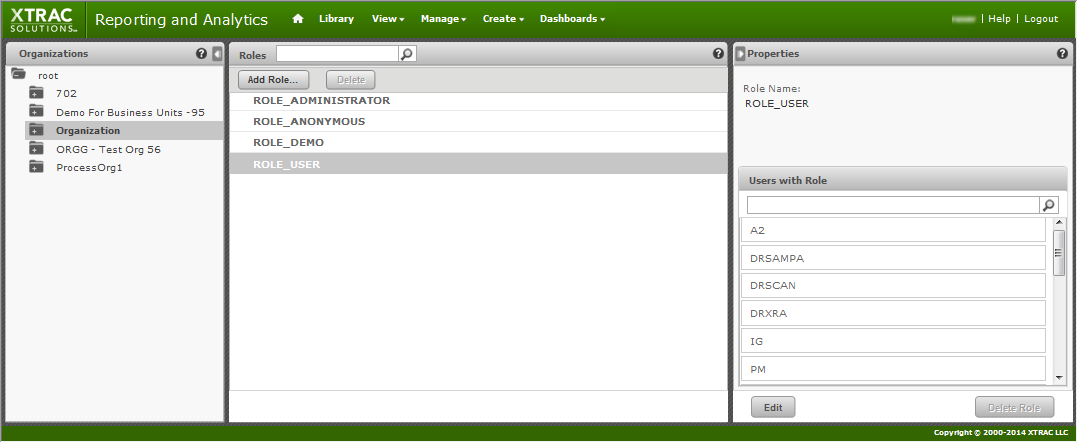
The list of roles includes all roles created by the administrator as well as default system roles for the selected organization and its suborganizations. The same role name can appear in different organizations, indicating that roles with the same name were created in different organizations. The second column gives the organization name of a particular role.
Selecting Organizations
In the Organizations pane, the default root organization displays all the roles in the selected organization and its suborganizations in the Roles pane.
To select an organization
| 1. | Expand the root folder in the Organizations pane by clicking its plus (+) icon. |
| 2. | If there are suborganizations, click the relevant folder to display its roles in the Roles pane. |
Searching for Roles
To search for roles by organization
- Select an organization in the Organizations pane by clicking its folder's + icon. Each selected folder or organization displays its roles in the Roles central pane.
To search for roles
- Select the organization and enter a search value in the search field above the Roles pane. The search results display all roles in the selected organization and sub organizations whose role name contains the value.
- To show all the roles again, click the "x" icon in the search box.
Managing Role Properties
- Select the role in the Roles pane. The role’s properties appear in the Properties pane, where you can manage the properties of the role if you have the correct credentials. See Managing Role Properties.
Creating Roles
To add a new role
| 1. | Log in as an administrator for the organization. |
| 2. | On the XRA menu, bar, select Manage > Roles. |
| 3. | In the Organizations pane, select the relevant organization. |
| 4. | In the Roles pane, click Add Role. The Add Role dialog box appears. |
| 5. | Enter the name of the role. |
| 6. | Click Add Role to <organization> to create the new role. |
The new role appears in the Roles pane. To assign users to the role, see Managing Role Properties.
Assigning Users to a Role
In the role's Properties pane, an administrator can assign multiple users to a role. Conversely, you can assign multiple roles to a user on the user's Properties pane of the Users pane. See Managing User Properties.
| 1. | Log in as an administrator for the organization to which you want to add a user. |
| 2. | On the XRA menu bar, select Manage > Roles. |
| 3. | In the Organizations pane, select the relevant organization to display its Roles pane. |
| 4. | In the Roles pane, select the role. |
You must be logged in as a system administrator to edit or delete the roles.
| 5. | In the role's Properties pane, click Edit. |
You can change the role name and the users assigned to it.
| 6. | If required, change the role's name. |
Note: Permissions in the repository that use the role name are automatically updated. However, role names in security files for Domains and OLAP are not updated with the new role name. If you use security files for Domains or OLAP, do not change role names without also verifying the files.
| 7. | You can do the following: |
- .To assign a user to a role, select the user in the Users Available list, and then click the right-arrow button to move it to the Users Assigned list.
- .To remove a user from a role, select the user in the Users Assigned list, and then click the left arrow to move it back to the Users Available list.
| 8. | Click Save to accept the changes, or click Cancel to confirm that you want to stop editing without saving any changes. |
Deleting Roles
To delete roles
| 1. | Log in as an administrator for the organization to which you want to add a user. |
| 2. | On the XRA menu bar, select Manage > Roles. |
| 3. | In the Organizations pane, select the relevant organization to display its Roles pane. |
| 4. | In the Roles pane, select the role. Use CTRL+click or SHIFT+click to select multiple roles. Alternatively use a search term to find specific roles. |
Note: You must be logged in as a system administrator to edit or delete the roles.
| 5. | On the toolbar, click Delete and confirm the deletion. |