|
XTRAC Process Designer User Guide |
|

|

Configuring Sequence Flow
A sequence flow that comes out of an exclusive gateway (  ) or an inclusive gateway (
  ) is called a conditional flow. A conditional flow can be configured with single and multi-expression rules. In the Conditional Flow Rule Editor you can define conditional rules that are applied to sequence flows coming from exclusive and inclusive gateways. The editor lets you build single or multiple condition expressions that trigger the rules when certain conditions are met.
Configure Sequence Flow Properties General Tab
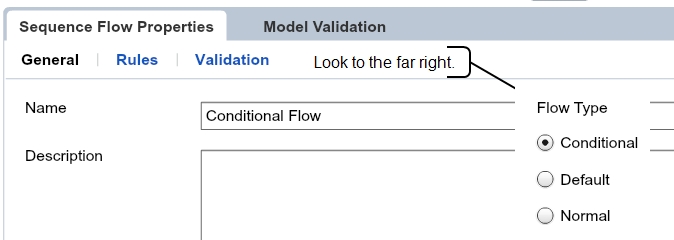
| 1. | Click a sequence flow and then click the Sequence Flow Properties > General tab. |
| 2. | Enter a name and description. |
| 3. | Select a conditional flow type from the options on the right: (the conditional type may be selected by default). |
- Conditional. Add 1 or more conditions that are evaluated down to a Boolean value of true or false.
- Default. A default flow is followed when all other conditional sequence flows are false.
- Normal. Sequence flow with no rules or conditions.
-
Open Conditional Flow Rule Editor
The Conditional Flow Rule Editor lets you define single expression and complex multi-expression rules on conditional flows. You can access the Conditional Flow Rule Editor using one of the following methods:
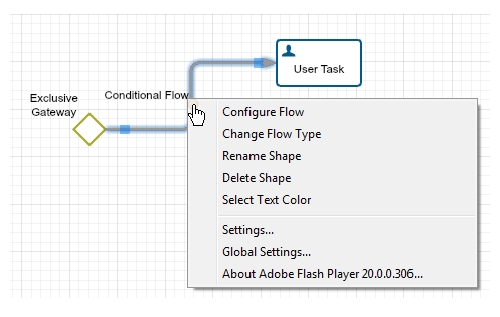
Context menu
- Right-click a conditional flow coming out of an exclusive or inclusive gateway.
- From the context menu, select Configure Flow.
Sequence Flow Properties Tab
- Select a conditional flow coming from an exclusive or inclusive gateway.
- Below the drawing canvas, click the Sequence Flow Properties tab.
- The properties panel for sequence flows opens.
- In the Sequence Flow Properties panel, click the Rules tab.
- In the Rules tab, click Configure (far right).
Add a New Condition Rule
| 1. | In the Conditional Flow Rule Editor, click New. |
A condition called "New Rule" is added to the Conditions list.
| 2. | With New Rule selected in the Conditions list, from Condition Details, select an option: Process Field or System Field. |
| 3. | Select from the Field Name drop-down list. |
| 4. | From the Operators drop-down list, select an operator, i.e. "=". |
Notes:
- The field names available from the drop-down list depend on the data types that have been added to the process.
- Based on the data type of the selected field name, the system displays the appropriate operators and value types in the Operator drop-down list. For example, if the field name data type is a string, the Operator drop-down list will only include the operators = and !=
Enter a value
| 1. | In the Value text box, enter a numeric value for integer data types or an alphanumeric value for string types. |
| 2. | Click Save. |
Note: If the data type you select in the Name Field is DateTime, the business calendar associated with the master work item rule will be available in the values field. For more information, see Using Business Calendars.
Define an expression
| 1. | Select the Expression option. |
| 2. | Click Create. |
The Create/Edit Value Expression dialog appears.
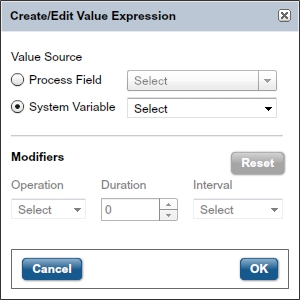
| 3. | In the Value Source field, select a process field (available fields depend on field names that have been added to the Conditions field in the Conditional Flow Rule Editor), or select a system variable (Current Date or Current Time). |
| 4. | (Conditional) If you have selected the System Variable option, the fields in the Modifiers field are available. Select the Operation (+ or -), Duration (a number greater than 0), and Interval (Days, Weeks, Months, or Years) to modify the selected system variable. |
| 5. | Click OK. |
The dialog closes and returns you to the Conditional Flow Rule Editor.
| 6. | Click Save to close the Conditional Flow Rule Editor and to apply the conditional rule to the selected sequence flow. |
The conditions are added to the Rules tab in the Sequence Flow Properties panel for the selected conditional flow. To modify the conditions, click Configure in the Rules tab.
Note: In the Exclusive Gateway Properties, conditional flow rules are evaluated in the order they are added to the process diagram. Make sure that rules are ordered from most specific to most general. Use the Sequence Flow Order tab in the Exclusive Gateway Properties panel for the selected exclusive gateway (see Configuring the Sequence Flow Order). You can also change the sequence flow rule order by using the Prioritize and Activate dialog (see Configuring Process SLA Rules).
Conditional Flow Rule Editor Interface
| Interface Item | Description |
|---|---|
| New | Click to add a new rule to the selected sequence flow. |
| Remove All | Click to remove the rules that have been added to the sequence flow. |
| Conditions | Displays a hierarchical tree view of the expressions that have been added to the condition rules. |
| Field Name | This drop-down list includes the names of the data objects that have been added to the drawing canvas. |
| Operator |
The operators available from this drop-down list depend on the data type of the data object that is selected in the Field Name drop-down list. Operators include: = (equal to) > (greater than) => (equal to or greater than) < (less than) <= (less than or equal to) != (not equal to) |
| Values | Use this text box to enter the value that corresponds with the selected operator. For example, if the operator is > you would enter a number in this text box. The Values text box appears only after a selection is made in the Operators drop-down list. |
| Expression | Select this option to define an expression. |
|
Create |
This button is only available when the Expression option is selected. |
| Cancel | Closes the Conditional Flow Rule Editor without saving any changes you have made. |
| Save | Closes the Conditional Flow Rule Editor and applies the conditions the selected conditional flow. |
XTRAC Community |

|