Working with System Field Data Types
Overview
System field data types are simple data types that give you access to system data such as current date/time. System fields are predefined data types that have been added to the XTRAC Data Dictionary. You cannot create new system fields or edit existing system fields.
You can only access system field data types from the Data Dictionary View in XTRAC Process Designer. System field data types are hidden in the Data Dictionary Editor so you cannot modify them or create new ones. Only XTRAC Administrators can create new system field data types in the Data Dictionary Editor. See System Field Data Types
Tasks
Add System Field Data Types to a Process
You can click and drag system fields from the Data Dictionary View to the drawing canvas just as you would add any other data type to a process.
|
1.
|
In the XTRAC Process Modeler, click the Data Dictionary tab to open the Data Dictionary View. |
|
2.
|
In the Data Dictionary View, click Sys. |
This displays all the system field data types that have been preconfigured and added to the Data Dictionary. This makes it easier to find the system fields you want to add to the process.
|
3.
|
Click and drag a system field from the Data Dictionary View and drop it on the drawing canvas. |
The system field data object displays it's default name followed by number. The number in the object's name is incremented by one each time you add the same system field to the drawing canvas.
For example, if you add the system field data type called CurrentDateTime, its default name displays as CurrentDateTime1 on the drawing canvas. If you place another CurrentDateTime object on the canvas, the default name is CurrentDateTime2.
You can change the default name by double-clicking its current name and typing a new name in the text box that opens.
Map System Field Data Types to Business Data
You can use system field data types as data inputs and outputs on user tasks, to map to data objects, and to design conditions on business rule tasks and sequence flows to trigger specific actions based on system data.
|
1.
|
On the drawing canvas, click a system field data object.
|
Below the drawing canvas, click the Data Object Properties tab to open the properties panel for the selected data object (if it is not already open).
|
2.
|
In the properties panel, click Business Data Mapping.
|
The Business Data Mapping tab lets you configure data mappings between XTRAC Process fields and XTRAC Workflow fields.
|
4.
|
In the dialog, click the drop-down list in the Workflow fields section and select a field name that is compatible with the selected data object as shown below:
|
Add System Fields as Data Inputs to User Tasks
|
1.
|
On the drawing canvas, select a user task. |
|
2.
|
Below the drawing canvas, click the User Task Properties tab to open the properties panel (if it is not already open). |
|
3.
|
In the properties panel, click Inputs and Outputs. |
|
4.
|
From the Data Dictionary View, click and drag a system field data type to the Inputs and Outputs tab in the properties panel.
|
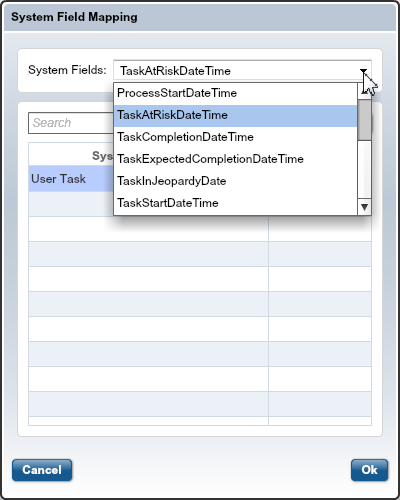
Note: Some system fields will automatically be associated with the process. Other system fields will need to be manually associated with the selected user task. Use the System Field Mapping dialog to map data input associations.
|
5.
|
To open the System Field Mapping dialog, click Map SYS on the Inputs and Outputs tab. |
|
6.
|
In the dialog, select the name of the selected user task from the System Field Source list.
|
Note: If you have a lot of user tasks in your process, each user task will be listed in the System Field Mapping dialog. Use the Search box above the System Field Source list to filter your search for a specific user task.
|
7.
|
From the System Fields drop-down list, select a system field data type.
|
Note: If the System Fields drop-down list grayed out, it means that a default system field type has been selected for you.
Configure System Field Data Types with Business Rules
|
1.
|
On the drawing canvas, select a business rule task. |
|
2.
|
In the properties panel for the selected business rule task, add system fields to the Inputs and Outputs tabs. |
|
3.
|
Click Map SYS to set up input and output associations. |
|
4.
|
In the properties panel for the selected business rule task, click Business Rule. |
|
5.
|
In the Business Rule tab, click Configure to open the Business Rule Task Editor. |
|
6.
|
In the Business Rule Task Editor, give the rule a name. |
|
7.
|
On the Condition tab, build a condition that will be based on available system field data. |
- To add a new condition, click New.
- A condition called New Condition is added to the Conditions section of the editor.
- In the Condition Details section, select System Field.
- From the Field Name drop-down list, select the system field you want to add to this condition.
- Note: Only system fields that have been added to the process are available from the drop-down list.
- From the Operator drop-down list, select the conditional operator that will act on the selected field name (equals, greater than, less than, and so on).
- The Values field opens. The type of value you add to the Values field depends on what type of field was selected from the Field Name drop-down list.
- For example, if a Date/Time field is selected, the Values field will let you use a pop-up calendar to select a specific day and a series of drop-down lists will let you select hours and minutes, and AM or PM.
- If the selected field requires that you enter a text string, the Values field will display a text box.
- In the Values field, enter the appropriate values for the selected field name.
On the Action tab, set the values for the outputs listed in the Output Field column.
|
1.
|
On the Action tab, click Edit to open the Value Editor dialog. |
|
2.
|
In the Value Editor dialog, select the default value displayed in the System Data field, or select Literal Value and enter a value.
|
For example, if the output is a Date/Time field, enter the exact date and time in the Literal Value field that will trigger this condition.
|
4.
|
In the Business Rule Task Editor, click Save.
|
The condition you just created is listed in the Business Rule Task Configuration dialog. You can have more than one condition act on a selected business task rule. If you want to add a new condition, click Add. If you have multiple conditions on the business rule task, you can set the order in which the rules are triggered by using the Up and Down buttons.


