Managing Data Objects
A data object is seen on the canvas looks like this:

Data objects function as information containers. The information they contain is defined by a data type such as an integer, date, or string. Data objects are used to exchange data values in and out of the process and process shapes.
Create Data Object
You can create new Data objects by selecting a data type from the Data Dictionary View and dragging it to the canvas. If you need to create custom data types, use the Data Dictionary Editor.
|
1.
|
In Process Designer, open the Data Dictionary View by clicking the Data Dictionary tab . |
|
2.
|
Click and drag a data type and drop it on the drawing canvas. |
When placed on the drawing canvas, the data object's default name reflects the name it was given when it was checked into the Data Dictionary followed by a number.
For example, if you place a data object named "AccountNumber", the name of the data object on the drawing canvas is "AccountNumber1". The number on the name is incremented by one each time you place another data object of the same type on the drawing canvas (AccountNumber2, AccountNumber3, and so on).
The data object name appears in the Process Data list.
|
3.
|
Access the Data Object properties by clicking a data object, see properties panel. |
|
4.
|
(Optional) Type a name. |
As you type in the properties pane Name field, the name is updated on the data object on the drawing canvas. You can also change a data object's name by double-clicking its name and typing in the inline text editor.
Associate Data Objects with Shapes
After data is added to the drawing canvas, it is available to be used by shapes in the process diagram. Use the properties panel for the selected shape to add data inputs and outputs, and to associate the data to the selected shape.
|
1.
|
On the drawing canvas, select a shape in the process diagram (for example User Task). |
|
2.
|
Below the drawing canvas, click the properties tab (if the selected shape is User Task the properties tab will display as User Task Properties tab). |
The properties panel for the selected shape opens.
|
3.
|
In the properties panel, click the Inputs and Outputs tab. |
|
4.
|
From the Data Dictionary list, click and drag a data type to the Inputs and Outputs tab in the properties panel. |
Note: The data type becomes a data object. If the data object name matches the name of a field from an associated master work item, it will automatically map an association between the data object and the field.
|
5.
|
Select a data object from the Inputs and Outputs list and click Associate. |
The Add Input Output Associations dialog is opened.
An Input Association and Output Association list of data objects may be displayed depending on how the input and Output check boxes are selected.
|
6.
|
In the Inputs and Outputs dialog, connect the input values to output values by clicking one or more data objects from the list. |
Find Where a Data Object is Used in a Model
In a process model, each shape references a specific data object and version. The Find Usages function opens a new tab in the properties panel, display a list of shapes that reference the data object and how it is used, and highlights the shapes on the canvas.
|
1.
|
Select a data object on the canvas. |
|
2.
|
Right-click a data object on the canvas and select Find Usages. |
- The border of shapes that reference the data object are highlighted.
- A new tab labeled Find Usages: <data object name> (Data Object), is displayed below the drawing canvas.
- A list of shapes with headings Name, ShapeType and Usage Type is displayed.
Change a Data Object's Type
You can change a data object's data type. The Change Data Type dialog allows you to select a new data type from the data dictionary view, enter a new name and displays a list of shapes that are affected. Be aware however, that when you change the type, the data might not map to the new type. For example, a simple data type embedded in a complex type or if the type is not compatible, i.e. string to integer.
Change Definition of a Data Object
|
1.
|
Right-click a data object on the canvas. |
|
2.
|
Select Change Data Definition. |
The Change Data Definition Type dialog is displayed.
|
3.
|
Choose a new type, e.g. simple, complex, system or value group. |
|
4.
|
(Optional) Enter a new name. |
Note: Changes are applied globally in the current process. Data definitions made on the canvas do not apply to process data inputs or process outputs.
Change Definition of Process Data Object
|
1.
|
Right-click an object in the Process Data list.
|
|
2.
|
Select Change Data Definition. |
The Change Data Definition Type dialog is displayed.
|
3.
|
Choose a new type, e.g. simple, complex, system or value group. |
|
4.
|
(Optional) Enter a new name. |
Note: Changes are applied globally in the current process. Data definitions made to process inputs and outputs do not apply to data objects on the canvas.
Change Data Object Version
When data objects have been updated, the version number referenced in each shape needs to be updated as well for the changes to be seen, see Managing Data Objects.
|
2.
|
Click Process Properties tab at the bottom of the screen. |
|
3.
|
Click Inputs and Outputs tab. |
|
4.
|
Click the version drop down list for a data object. |
|
5.
|
Select a different version.
The Change Data Definition Type dialog is displayed. |
|
6.
|
Select one of two options: |
- To change any instance of the data object to the selected version, select Change All Instances.
- To change one data object, select Change Associate Inputs & Outputs.
Update Data Object Associations
Each time a data object is changed, it is saved as a new version. In the model, the data object associations need to be updated before the changes will be seen. For example, in the Data dictionary, a complex data object has been changed and saved to a new version in the Data Dictionary Editor. You can update all of the associations using the Change Data Version Summary dialog.
|
1.
|
Click a Data Object on the canvas. |
|
2.
|
Click the Data Object Properties tab and then the Data option below. |
|
3.
|
If there are multiple versions, click the Version drop down list and select a different version. The Change Data Version Summary dialog opens. 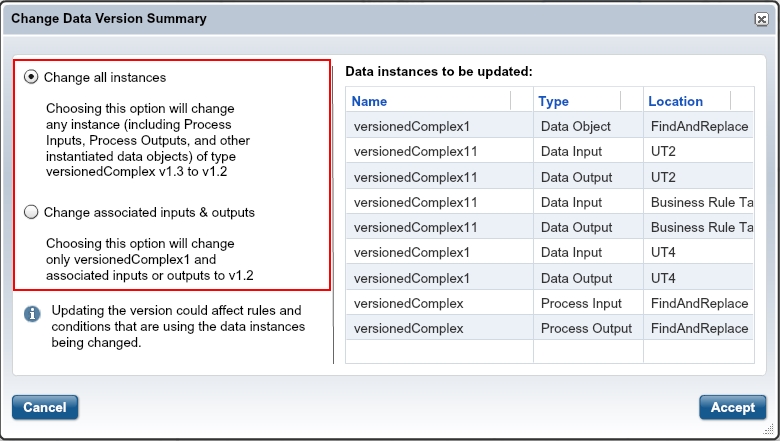
|
|
4.
|
Do one of the following: |
- To change any instance of the data object to the selected version, select Change All Instances.
- To change one data object, select Change Associate Inputs & Outputs.
See Also


